Categories
Fire and smoke damage restoration

How to Clear Wildfire Smoke from the Home

24/7 EMERGENCY SERVICE RESIDENTIAL & COMMERCIAL SERVICES

Optimum air quality is essential for health. Blazing wildfires send wafts of smoke into communities, polluting the air people breathe. The air inside homes, too, reaches unhealthy levels because of smoke damage, leaving occupants irritated and nauseous. It’s important to clear wildfire smoke from the home.

Forests in Quebec, Canada, are blazing and sending billowing clouds of dark smoke to the surrounding areas. Currently, 492 active fires burn across Canada, with nearly half of them burning out of control. The fires from May and June do not show any signs of abating.

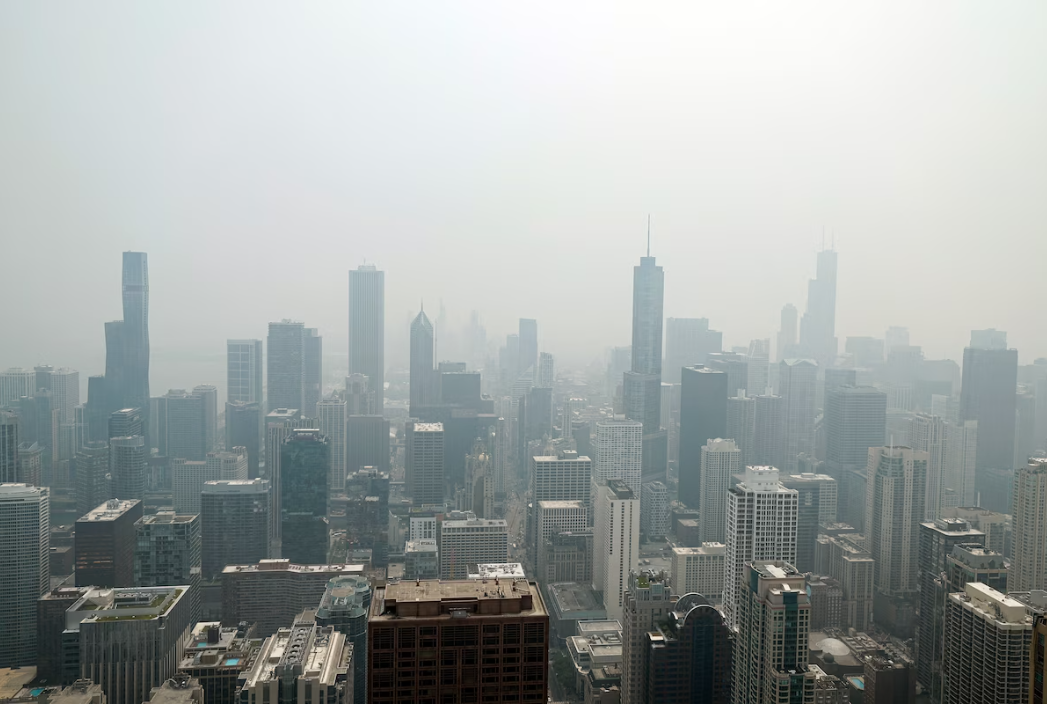
The Canadian wildfires affect the air quality in the US. Chicago, Illinois, primarily, has reached the top of the list of major cities with the worst air quality. Minneapolis, Minnesota, and Detroit, Michigan, have also won spots in the top 10 cities with unhealthy air quality.

These cities are only a handful of the many metropolitan areas in the US that have seen drastic reductions in air quality as a result of the Canadian wildfires in the past two months. Air quality alerts have forced residents to limit their time outdoors.

Outdoor air quality may be at unhealthy levels, causing people to scramble indoors. But smoke damage from wildfires can also impact the quality of air inside the home. Smoke odors can cause nausea, headaches, and constant irritation, prompting homeowners to rid their homes of smoke.

Wildfire smile causing unhealthy air quality - by Chicago Department of Public Health

How long does wildfire smoke odor last in the home?

Smoke odors can last inside the home for as long as the smoke particles are left uncleaned. Smoke particles are microscopic and travel far, blanketing surfaces in the home and damaging goods. Although smoke particles cannot be seen, they are still a cause of smoke damage.

Even after scrubbing the home clean, smoke odors can linger. The only way to eliminate the awful odors is to eradicate the source of the smell—meaning every trace of smoke must be removed. An ozone generator is useful in destroying the smoke molecules causing the odors.

How long does it take to remove smoke odor?

Rugs, furniture, and carpets absorb smoke particles, making it difficult to remove the smoke odors. Worsening matters is waiting to clean up the smoke damage, which intensifies the longer a homeowner procrastinates. Begin cleanup a few days after the blaze has been extinguished.

Depending on how diligently homeowners clean, the smoke damage can be cleared in an estimated two to four weeks. However, a more precise timeline can be determined by the cleaning methods the homeowner uses or whether a smoke damage restoration service is hired.

Will an air conditioner filter out smoke?

Air conditioners are intended to cool air, not purify it. However, they can help improve air quality. The filter is the most critical component to the success of maximizing air purification. An air filter designed specifically for wildfire smoke works to filter odors, chemicals, and particulate matter.

What are the steps to clear wildfire smoke?

Step 1: Place baking soda throughout the home

A few simple steps can clear the home of wildfire smoke damage. A household staple, baking soda, is powerful enough to handle the task. Place bowls of baking soda throughout the home. The baking soda will absorb the smoke odors.

Place baking soda throughout the home

Step 2: Increase ventilation

Open the windows to increase ventilation. Smoke particles will be pushed out when fresh air rushes in. Run multiple fans in the affected spaces, which further increases the flow of fresh air. Set up an exhaust fan at the front door, ensuring it faces the interior.

Step 3: Wipe down walls and surfaces

Wipe down walls that have been affected by smoke damage. Mild soap and a clean rag are enough to remove the smell from these surfaces. Use cleaning products on countertops and similar hard surfaces to remove lingering soot and odors.

Step 4: Shampoo carpets

Fabrics, such as curtains, bed linens, and carpets, must be cleaned. Shampoo the carpets or hire a professional service to remove the offensive smells. Upholstered furniture may have to be replaced if the smoke odors have permeated deep into the materials.

Step 5: Clean the exterior

Clean the outside of the home, too, in order to lessen the smoke damage indoors. A power washer can be used to rinse the exterior, including the siding, windows, and deck. Removing smoke particles on the exterior can prevent them from seeping back inside later.

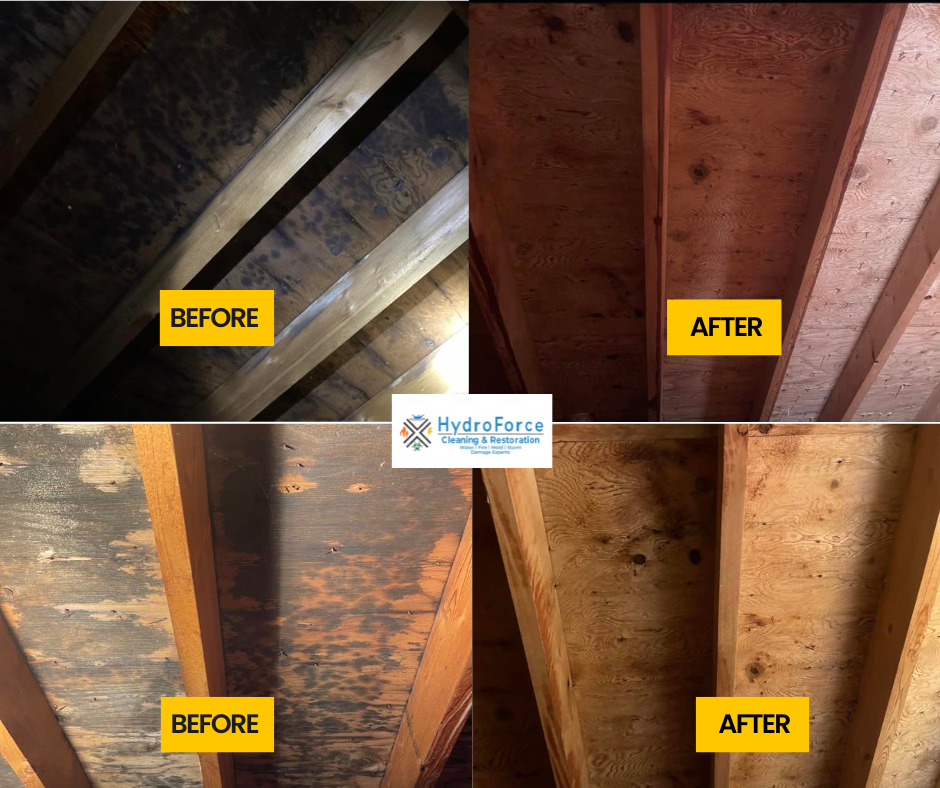
When wildfires blaze, the destruction is not contained. Nearby localities can be severely impacted and require professionals to remove the smoke. If your city has been engulfed in wildfire smoke, your home will need the expertise of the smoke damage restoration crews at Hydroforce Cleaning and Restoration.

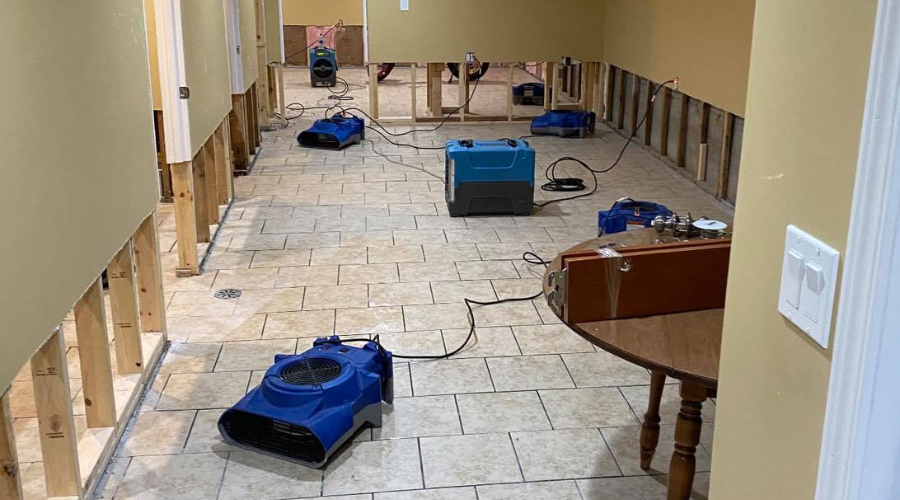
We provide efficient smoke and soot damage restoration services that return your home or business to its pre-loss condition fast. Our team of highly qualified technicians arrive at your home, perform an assessment of the damage, and tarp the building, if necessary, to stabilize it.

Specialists begin pre-cleaning immediately to stop the spread of soot damage on surfaces and materials. We also clean and restore upholstery and fabrics. When clothing and linens are affected, our convenient content cleaning and pack-out services will be an invaluable resource.

Hydroforce Restoration specialists

Hydroforce Cleaning and Restoration crews also provide odor removal services, ensuring the air quality inside your home or business returns to an optimal level. Smoke damage cleanup delivers the best results when the property owner initiates cleanup promptly after the fire is extinguished.

Even after the flames have been extinguished, damage continues in the form of soot, smoke, and other corrosive byproducts of the fire. Certain household materials can become permanently damaged within a few hours to a few days if cleanup is not immediately begun.

Hydroforce Cleaning and Restoration technicians stand by 24 hours a day to respond quickly to property smoke damage. Homes and businesses in Chicago, Illinois, and the surrounding neighborhoods, can count on us for thorough smoke cleaning and smoke odor removal by calling 630-835-0862.

Categories
Mold Remediation

How to Test for Mold in My Apartment

24/7 EMERGENCY SERVICE RESIDENTIAL & COMMERCIAL SERVICES

Mold at your apartment can be noticed via a musty smell or spots and patches around windows and other areas. There are various ways to test for mold which can be costly, however you can also use a home kit as a cheaper alternative.

How to Figure Out if You Have Mold in Your Apartment

The best way to test for mold in your apartment is to use a home test. Also, if you have obvious brown, black, or even gray spots on various surfaces in your home, you may have mold. The most dangerous type of mold is black mold. It usually appears on wood, paper, fabric, and even insulation. It does not always look black as it can also be blue or gray. However, mold sometimes hides in different areas such as between cupboards and the wall, corners of walls, or any area that may have little air ventilation. You should also be sure to check areas that have plumbing pipes as they can leak and create a moist area that may allow mold to grow. Leaving mold unattended can cause various health issues so it is always best to deal with it right away to avoid further problems.

How to Test for Mold in Your Apartment

You can have your home either tested by professionals or you can use a home kit and test for mold yourself. No matter what type of test you use, if you do find that you have mold present at your property, you should make sure it is remediated right away before it spreads further and causes damage to your property.

Professional Mold Testing:

If you have a professional mold inspector test your home, they will take a sample from three different areas including the air, surface, and the surrounding dust. The sample will then be sent to a third-party lab which will figure out the concentration and the type of mold you have in the affected areas.

mold growing on the apartment ceiling

Mold Testing:

You can use a store-bought mold testing kit to figure out if you have mold present at your apartment. The mold you will usually see indoors includes Cladosporium, Alternaria, Penicillium, and Aspergillus or even black mold or Stachybotrys.

Here are a few common mold testing kits you should know about if you decide to do mold testing yourself:

5-Minute Mold Test:

This test is quick and easy and uses one test swab and one test strip for Stachybotrys and Penicillium/Aspergillus. You can test multiple samples for the lab, and you get a pre-paid mailer. Basically, you will need to swab the area, wet it in the provided solution, and apply it to the test strip. If you have one line, your test is negative and if you have two, then you have the specified type of mold present at your property.

Mold Armor FG500 Do It Yourself Mold Test Kit:

In this mold testing kit, you will get a test swab, a petri dish, and a bottle of medium that grows mold. You can use the kit in three ways. This means you can test the air, test the air quality of your HVAC duct, or test the surface for mold. The process of testing is simple. You will need to pour the growth medium into the petri dish, replace the lid, and allow it to grow gel for one hour. Next, you have the option to stay open to the atmosphere to test the quality of air, you can tape it to your air duct for an HVAC test or use the swab to remove the sample and apply it to the growth medium so you can do a surface test. It will take 48-96 hours for mold to grow in your dish. You can also send it to the lab for analysis for $40. The test kit itself is under $10.

mold test kits

Do it Yourself Mold Test:

With this test kit you get three tapes to get samples from surfaces. You will then need to mail them back for analysis. All the instructions are included in the kit. The usual cost of the kit is around $45 which includes the lab fees to test for all mold types. You will simply need to apply the tape to wherever you see mold in your home, lift it off, and adhere to the sample card included with the kit. You will get a full lab analysis report in the mail.

Keep in mind that you should always wear protective gear if you plan on testing for mold. It is important to wear long sleeves and pants, proper shoes, gloves, and goggles without vent holes and an N95 respirator. If you do one of the home kits and get positive results, at that point you can decide whether to get the mold removed yourself or hire a professional to do so.

Common Areas for Mold to Appear

  • Area around the plumbing lines
  • Under the sink
  • Within walls or around windows that may be leaking
  • In closets
  • Under the carpet if you’ve had a flood
  • Behind the fridge
  • Between furniture, on the exterior of walls
  • Coils of HVAS or ductwork

Common Causes of Mold in Apartments

Water Leak Causing Mold in bathroom

Mold thrives in cool and damp spaces. There are various reasons why you may experience a mold infestation. Here are a few:

  • Water leak

When you have a mold infestation, it may be caused by a leak. Even if you fix the leak,

mold can linger inside walls and floors; the mold spores grow quickly and cause it to spread.

  • Water that enters from the outside:

If you have badly fitting windows or cracks in your walls or doors, you may end up with some moisture inside your home.

  • Water from condensation

Condensation is caused by the water we exhale and from showering and cooking. It condenses on cool surfaces such as on walls and can cause mold. Also, if you have indoor humidity that is higher than 60 percent or an indoor temperature of 60 F or lower, this can also be a cause of mold.

Preventing Mold

You can prevent mold by using dehumidifiers or air conditioners to get rid of extra moisture from air indoors, you can also run exhaust fans in your kitchen and bathroom and make sure to heat your home during cold weather.

Have you experienced mold at your apartment? If so, make sure to give HydroForce Cleaning and Restorations a call today. Our highly trained professionals will provide you with all the needed mold testing and remediation services right away to ensure your space is safe for you to inhabit. For more information about our mold removal services you can call us today at 630-835-0862.

Categories
Mold Remediation

Steps to Remove Mold from Plywood in the Attic

24/7 EMERGENCY SERVICE RESIDENTIAL & COMMERCIAL SERVICES

Steps to Remove Mold from Plywood in the Attic

The attic is a part of the home that often gets neglected. However, you should not ignore your attic as it is a prime spot for water damage and mold growth. It is important to regularly check the walls, floors, sides, and corners of the attic to make sure there is no mold forming anywhere. If you do notice mold, it is crucial to address it right away as it can cause significant damage and have an effect on your health.

Why does plywood get moldy?

Mold can appear on treated or untreated plywood. The causes of mold on plywood include temperature, humidity, extra moisture, and the presence of mold spores. Mold on plywood is typically black in color, and it spreads quickly if it has the right conditions, especially if it is wet and humid. Mold and algae affect only the surface and do not get into the plywood structure itself. However, when there is decay in the plywood, the mold can penetrate the surface.

Removing Mold in the Attic

What does mold on plywood look like?

Mold on plywood is typically black or green in color. It can appear on untreated plywood and on H3.1 LOSP and H3.2 treated plywood. This is most likely to happen if the plywood becomes wet or the attic has the proper conditions for mold to form. Sometimes weather conditions involving heat or humidity can create the right conditions for mold to form.

Here are some things you should look out for if you think you have mold on the plywood in the attic:

  • If there is moisture present, you may already have mold.
  • The wood looks damaged and discolored.
  • If you see spores on the surface of the wood packaging, you may have mold.

Identifying mold on your plywood can be tricky as you may mistake it for simple iron stains, mineral discoloration, or sun exposure. Make sure to consult a professional to determine if you have mold and start the remediation process right away. Also, speak to them about future preventative measures you can take to avoid mold.

Preventing Mold

Mold in your attic happens due to excess moisture from a leak in your roof, or an issue with the structure that is causing the extra moisture. The mold spores in the attic will spread to the rest of the home quickly and exposure to mold can trigger allergic reactions. It is important to prevent mold in your attic to avoid property damage and the possible health effects.

Here are some steps to follow so you can be sure to prevent mold in your attic.

  • Keep a minimal difference in exterior and interior temperature:

Make sure that you keep the temperature inside similar to the temperature outside so that you do not create condensation on the underside of roof sheathing.

  • Work with a professional to identify air leaks:

A professional will be able to identify any air leaks in the interior of your attic.

  • Get any points of entry air sealed:

You should make sure to air seal any points of entry such as bathroom fans and hoses, recessed lighting etc. Also, if you have any holes or gaps where there is wiring, plumbing, vents, pipes, or ducts, make sure to get those sealed.

  • Check for ventilation that is damaged or blocked:

Check all the rafter ventilation and make sure it is not blocked or damaged.

  • Repair the baffles:

If your rafter ventilation is broken or improperly installed, make sure to repair it.

  • Allow for proper ventilation:

You can decide on the proper amount of ventilation in your attic by figuring out the amount of roof ventilation that is needed for your attic space.

  • Fix the roof if needed:

If you have leaks in the roof or any damage, make sure to get it repaired.

  • Decrease moisture:

If you have moisture coming in from a gap or a crack, make sure to get it fixed.

  • The appliance vents should be on the outside:

The vents for your appliances coming from the bathroom, kitchen, and the dryer should blow air to the outside.

  • Use insulation:

Make sure you are using the proper insulation like cellulose to prevent the formation of mold growth.

Removing Mold in the Attic

Even if you take all the abovementioned precautions, you may end up with mold in your attic. It is always easier to have it removed by professionals, however, if the surface area is not too large, you can attempt to remove it yourself. Here are the steps to follow:

Remove Mold in the Attic before and after

1.  Seal the area and use protective gear:

Cover the surrounding area with plastic sheeting so that mold spores don’t spread. Use protective gear such as googles, masks, and rubber gloves to protect yourself.

2. Vacuum the area:

If there is water present, make sure to use a wet vacuum to get rid of it. Then dry out the area with fans, dehumidifiers, and heaters. Next, dry vacuum to get rid of the mold spores.  Make sure to empty the vacuum outside and seal the bag you’ve used to dispose of it, so the spores do not spread.

3. Clean off the mold:

If the mold hasn’t gotten through very deep into the wood, it can probably be killed with dish soap and warm water. Take a teaspoon of soap and fill a spray bottle with water and shake it up. Next, spray the area and scrub it with a brush to get rid of the mold. Finally, dry the area with a towel. You can also use distilled white vinegar. Make sure to use equal parts vinegar and warm water in a spray bottle and spray it on the mold. Next, let the solution dry for an hour and then wipe it with a wet cloth and then a dry one.

The final option is using borax, which is a more natural and safer way to clean than bleach. Use a tablespoon of borax with a cup of water, then put this solution on the molded area with a brush. Make sure to scrub the mold away which will leave the borax solution in the wood. Do not sponge up the extra liquid. You want to make sure leave as much solution as possible so that future mold growth can be prevented.  Finally, use a humidifier or a fan so that the wood can dry quickly.

4. Sand the wood:

The mentioned cleaning solutions should get rid of the mold issue, however, if you are unable to get rid of it, the final solution is sanding. Make sure to use 100-grit sandpaper on the affected area while making sure to not sand away too much of the surrounding area. Keep repeating this process until the mold spores have loosened.

Mold can happen at any time in your attic, especially if it is not maintained. If you’ve experienced mold at your home or business, we can help. Mold in your attic can cause costly damage. We provide complete mold remediation to ensure that the mold is fully removed, and that it does not come back. For all of your mold removal needs make sure to reach out to HydroForce Cleaning and Restoration at 630-835-0862.

Categories
water damage water restoration

How to Dry a Flooded Basement

24/7 EMERGENCY SERVICE RESIDENTIAL & COMMERCIAL SERVICES

Flooding in your basement can happen due to many reasons as the basement is the most vulnerable area of your home to flooding. Whether your basement floods because of inclement weather, a sewage backup, or a foundation leak, you need to act quickly and get it cleaned up. The quicker you act, the easier it will be to dry out, clean, and restore the area. Fast restoration will also prevent mold from forming, avoiding additional and costly damage.

flooded house cleanup

Reasons for Basement Flooding

Your basement can flood for many reasons; however, it is important to try and prevent these things from happening. Here are some reasons why your basement may flood.

  • Cracks in the foundation:

If your concrete foundation has any cracks or signs of stress such as from the outside, and possibly on the floors and walls, it is a good idea to get those fixed right away, especially small cracks. However, if the cracks are large, you may have to hire a professional to get it fixed.

  • Dirty downspouts and gutters:

If you do not clean your downspouts and gutters and they get debris and leaves stuck in them, rainwater can overflow and seep into your home.

  • Leaving window wells uncovered:

You should always cover your window wells with acrylic to keep water, leaves, and critters out of it.

  • Failing to maintain your sump pump:

It is important to keep your sump pump working well so that it can keep water out of your basement. Sump pumps will fail to work if they clog or if there is a power outage. You should inspect them regularly and make sure they run properly.

  • Regrading your lawn:

You should make sure to level out your yard so that rainwater can drain away from your foundation. This will help keep water out of your home and your basement.

  • Failed water leak sensor:

Water leak sensors can help prevent water damage at your home. You should put them in flood-prone areas of your home and your smart device will alert you if there is a water leak. Make sure to keep it working properly so it can detect the damage when needed.

water leak sensor

How long does it take to dry out a wet basement?

Wet basements can happen for many reasons and whether it is due to heavy rain, extreme weather, or a plumbing accident, it can be a stressful situation. Even though it may seem difficult to dry out a flooded basement, if you take the right steps and do it properly, you should be done in a couple of days.

Here are the steps to take to remove water and dry your basement:

  • Shut off power:

You should shut off the power supply to the basement to keep yourself safe. A professional electrician can help.

  • The outside water level should be lower than the water inside:

This step applies if there is flooding inside and outside your home. You can use a tape measure to measure the height of the water. The reason the water levels are important is because if you pump out water in your basement too fast before the level outside your home is lower, the weight of the water can damage the walls of your basement.

  • Soak up water with towels if its less than 2 in:

Use towels to soak up water in your basement and wring them into buckets which you will empty outside. Make sure to wash the towels as soon as possible so they don’t get mold. You can also use mops and buckets.

  • Pump out water with a wet vac or sump pump:

A wet vac can help pump water out of your basement if it is only a few inches deep. If the water is deeper, you can use a sump pump. A wet vac can be rented from a local hardware store if you do not have one handy.

  • Circulate air in the water damaged area:

Make sure to use big fans and your windows to circulate air in the water damaged area. This will help dry the area so that mold does not form and cause further damage. Move any furniture and other possessions out of the way. Also, use a dehumidifier to remove leftover moisture so you can be sure all areas have been dried. You can also run your air conditioning system if it was not flooded so that you can keep the air dry inside the home.

Circulate air in the water damaged area

  • Clean the floors and drains:

Wearing protective equipment such as long pants and sleeves, boots, rubber gloves, protective eyewear, and an N95 mask you can clean up all the standing water while protecting your health. If you have a carpeted basement, you should tear it out. This is important because the padding under it gets wet as well and can grow mold and mildew. The floor should be scrubbed with a solution of bleach and water. This will help brush any mud and dirt out of tiles, linoleum, and even hardwood floors. It will also help deodorize and prevent mold and mildew.

  • Clean the drainage system by hand:

Make sure all your gutters, downspouts, and drains are cleaned by hand to scoop out leaves, mud, and anything else that may block them.

  • Wash walls and masonry with a high-pressure washer:

Use a pressure washer to rinse the walls and remove dirt and stains. The walls can also be scrubbed by using a solution of bleach and water which will prevent bacteria and mildew from forming.

  • Replace any damaged drywall and insulation:

Water damaged drywall and insulation should be replaced as it can cause mold and mildew to grow, and it can even weaken the structure of your property.

Does home insurance cover flood damage?

Generally, homeowners’ insurance does not cover damage from flooding. However, you can purchase separate flood insurance so that you can have coverage. You could also add a flood endorsement to your home insurance policy. The type of coverage you have for your home will depend on the type of endorsements you added, however, flooding is commonly a home insurance exclusion. If you are unsure what coverage you have, make sure to speak with your insurance agent and they can review the policy with you. If you need flood insurance, make sure to add it.

Contact Us for Water Damage Mitigation


If you’ve experienced flooding in your basement, Hydro Force Cleaning and Restoration can help! We will make sure to arrive quickly and take care of the cleaning, drying, and restoration of your basement. Our highly trained technicians specialize in flood damage cleanup. Whether it was caused by a natural flood, inclement weather, or something else, we will take care of your flooded basement quickly and efficiently. For all of your water damage restoration needs, call us today at  630-835-0862.