Categories
water damage

Top Causes of Water Damage in Chicago: How to Protect Your Home from Floods & Leaks

24/7 EMERGENCY SERVICE RESIDENTIAL & COMMERCIAL SERVICES

Top Causes of Water Damage in Chicago: How to Protect Your Home

In just two short months during the summer of 2023, over 12,000 cases of water damage were reported in Chicago, highlighting just how common and costly this issue can be for homeowners. Understanding the top causes of water damage in Chicago is essential not only for preventing expensive repairs but also for protecting your home and family.

In this guide, we’ll explore the most frequent culprits behind water-related disasters in Chicago homes, share tips to minimize risks, and explain when it’s time to call in professional water damage restoration experts.

What is Water Damage and Why It’s a Risk for Chicago Homes

Water damage occurs when unwanted moisture intrudes into your home, leading to both immediate problems and long-term consequences. Beyond obvious inconveniences like wet floors or damaged furniture, water can compromise your home’s structural integrity, promote mold growth, and result in costly personal property loss.

Due to aging infrastructure and increasingly intense, climate-driven storms, roughly 37.8% of properties in Chicago, over 227,000 homes, are at risk of flooding, making awareness and prevention more important than ever.

Types of water damage homeowners may encounter:

  • Clean water: Often from burst pipes or leaking faucets, this type is generally safe initially but can still cause structural damage if left untreated.
  • Gray water: Originating from appliance leaks, washing machines, or dishwashers, gray water can contain bacteria and requires prompt cleanup to prevent mold growth.
  • Black water: The most hazardous, black water comes from flooding or sewer backups and poses serious health risks along with extensive property damage.

Recognizing the type and source of water damage early is critical for mold prevention and protecting your home’s foundation.

Common Causes of Water Damage in Chicago Homes

Common Causes of Water Damage in Chicago - HydroForce Cleaning and Restoration

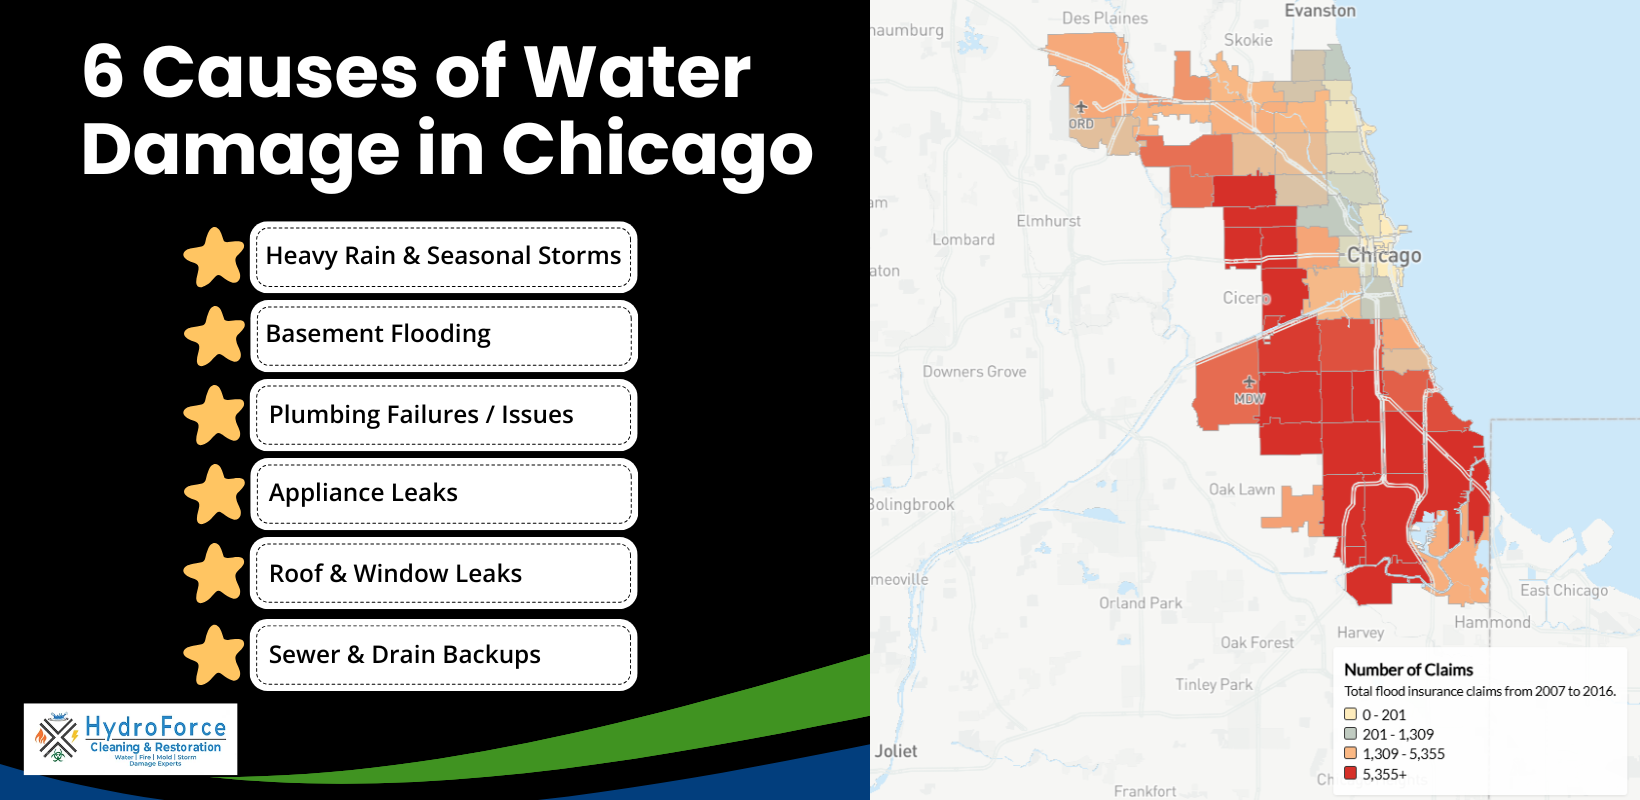
Understanding the top causes of water damage in Chicago homes allows homeowners to take proactive measures. Here are the most frequent culprits:

1. Heavy Rain and Seasonal Storms

Chicago’s summer storms and seasonal heavy rainfall can quickly overwhelm drainage systems, leading to basement flooding and water intrusion through foundations or exterior walls. Even moderate storms can cause significant damage in older homes without proper waterproofing.

2. Basement Flooding

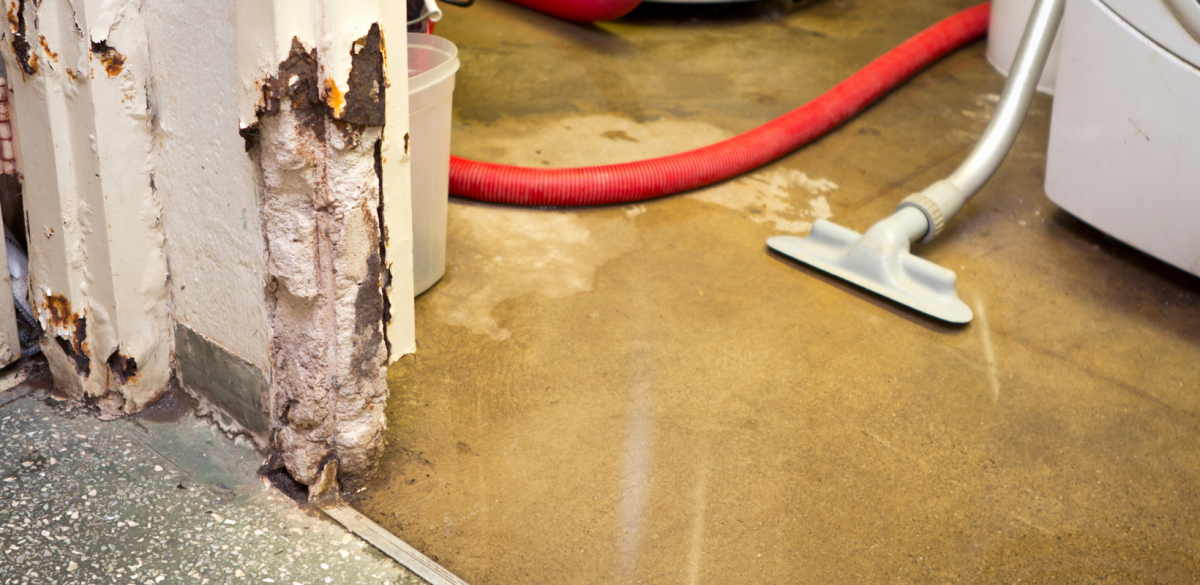
Basements are particularly vulnerable to water damage. Cracks in foundations, poor soil grading, or malfunctioning sump pumps can allow water to seep in, damaging floors, walls, and stored belongings. Routine inspections and mold prevention measures are essential to protect these often-used spaces.

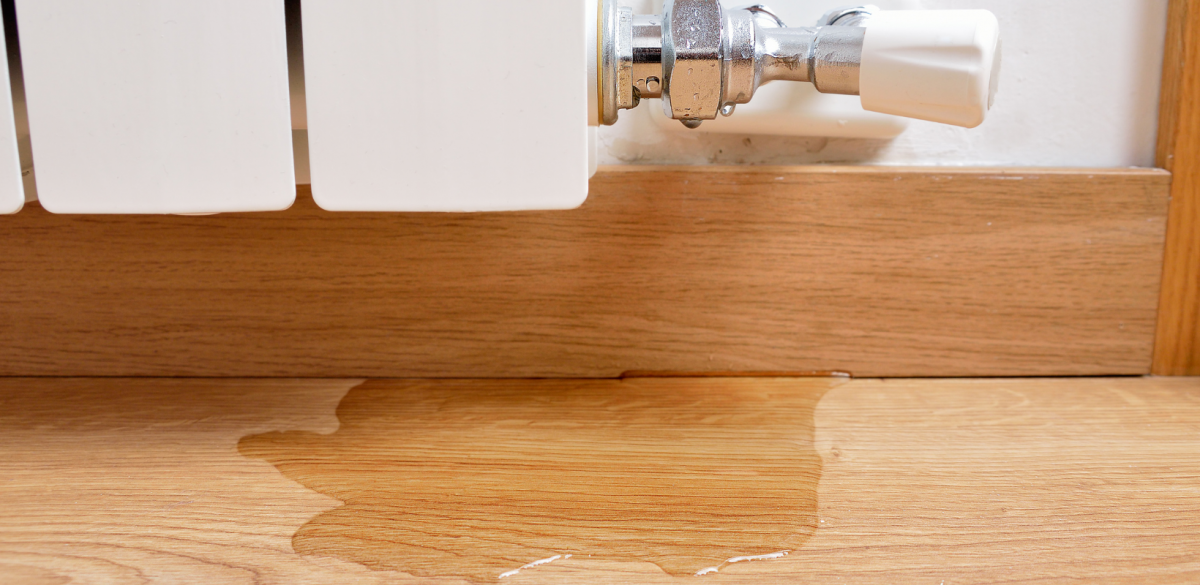
3. Plumbing Failures and Burst Pipes

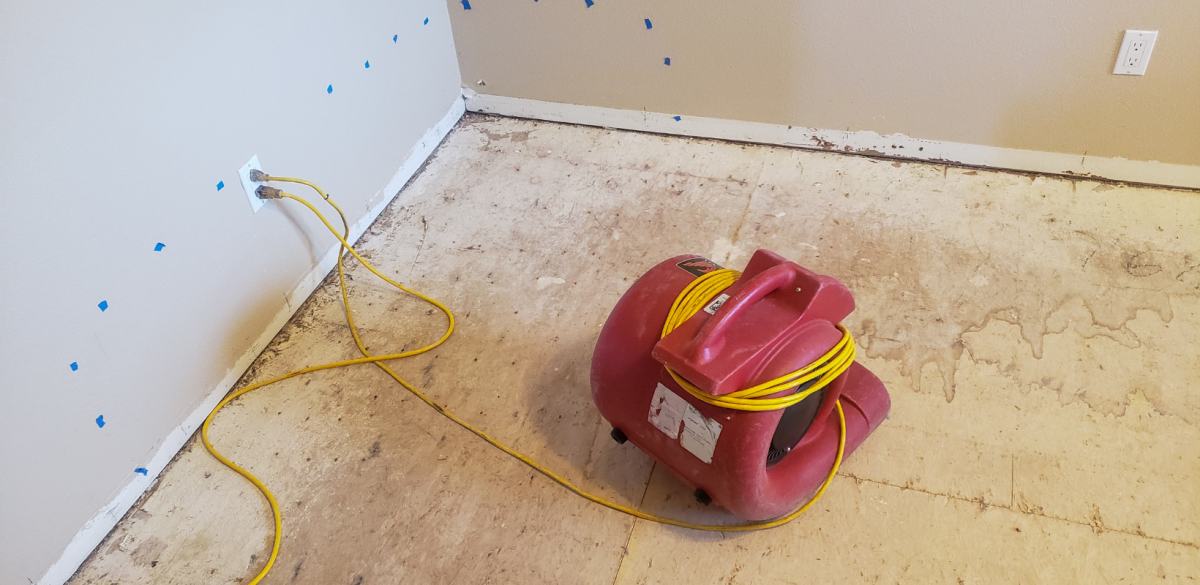
A burst pipe or a sudden plumbing failure can release large volumes of clean water in a short time. Homes with older plumbing systems are especially at risk, and unchecked leaks can cause structural damage, ruined furniture, and flooring issues.

4. Appliance Leaks: Washing Machines, Dishwashers, and More

Leaking appliances are a common source of water damage. Washing machines, dishwashers, and water heaters can develop cracks or loose connections, producing gray water that, if ignored, may lead to mold growth and damage to cabinets, walls, and flooring.

5. Roof and Window Leaks

Damaged roofing or poorly sealed windows let rainwater enter your home, causing damage to ceilings, walls, and insulation. Over time, these leaks can compromise the home’s structure and encourage hidden mold development.

6. Sewer and Drain Backups

One of the most dangerous causes of water damage is black water from sewer backups or clogged drains. This water carries harmful bacteria and contaminants, making professional cleanup essential to protect health and property.

How Chicago Homeowners Can Prevent Water Damage

Preventing water damage in Chicago requires a combination of proactive home maintenance, flood preparedness, and regular inspections. By addressing the most common sources of water intrusion, homeowners can protect their property, prevent mold growth, and avoid costly repairs.

Here are practical steps you can take:

  • Maintain your roof, gutters, and downspouts: Ensure shingles are intact, clean debris from gutters regularly, and direct downspouts away from your foundation to prevent basement flooding. Proper waterproofing of exterior surfaces can also keep rainwater out.
  • Inspect plumbing and appliances regularly: Check pipes, faucets, and appliances like washing machines and dishwashers for leaks. Early detection of home water leaks can prevent major damage from both clean and gray water sources.
  • Install and maintain sump pumps: A functional sump pump is essential for homes with basements. Test pumps before the rainy season to ensure they’re ready to handle heavy rainfall and prevent water accumulation.
  • Seal basement cracks and grade soil away from your home: Small foundation cracks can allow water to seep in, so seal them promptly. Additionally, proper soil grading ensures rainwater flows away from your home rather than pooling near the foundation.

Regular attention to these areas is crucial for long-term home maintenance and mold prevention. By combining preventive measures with awareness of potential hazards, Chicago homeowners can significantly reduce the risk of water damage and protect both their property and their peace of mind.

Read: Best Detection Methods to Find Water Leaks in Your House

When to Call a Professional Water Damage Restoration Company in Chicago

While minor leaks can sometimes be handled DIY, professional help is essential in many situations.

You should call an expert if you experience:

  • Major flooding from storms, sewer backups, or burst pipes that overwhelm your home’s capacity to dry safely.
  • Visible or suspected mold growth can spread quickly and pose health risks if not treated properly.
  • Insurance documentation needs, where accurate records and professional reports are required to process claims efficiently.

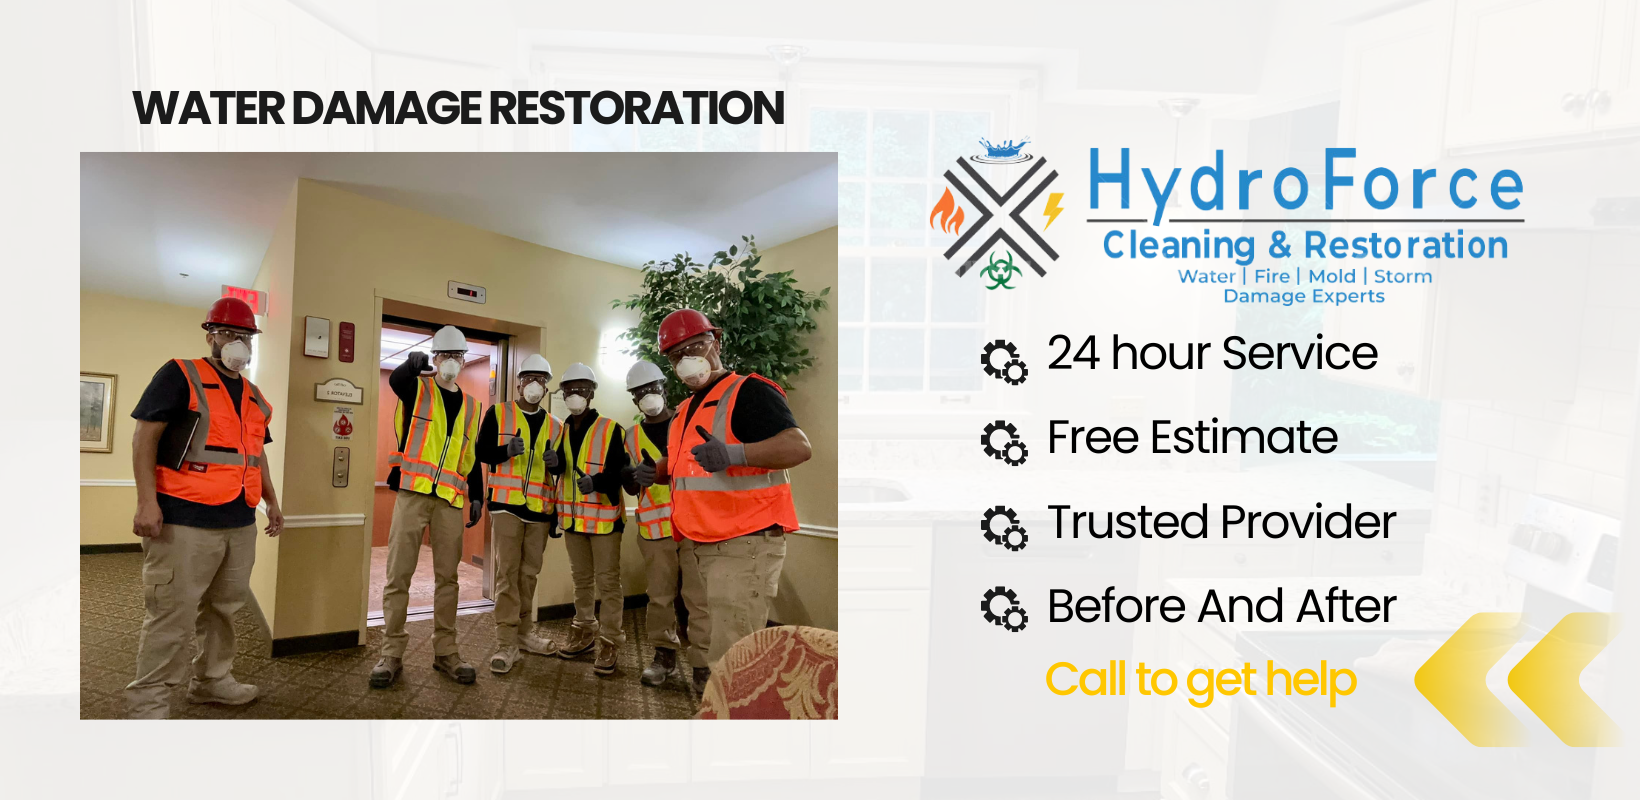
HydroForce Cleaning & Restoration is a trusted Chicago water damage company with years of experience helping homeowners recover from water-related disasters. We provide professional water damage restoration services, including emergency water cleanup, structural drying, and comprehensive documentation for insurance purposes. With their rapid response and expert techniques, you can safeguard your home, prevent further damage, and restore your property with confidence.

Quick Checklist: Protect Your Home from Water Damage in Chicago

  1. Inspect roofs, windows, and gutters before storm season.
  2. Check plumbing, appliances, and water heaters for leaks monthly.
  3. Test sump pumps and ensure proper basement grading.
  4. Seal foundation cracks and waterproof vulnerable areas.
  5. Call HydroForce Cleaning & Restoration immediately if severe water damage occurs.

Water Damage Restoration - HydroForce Cleaning & Restoration

Protect Your Home from Water Damage in Chicago

Water damage in Chicago can strike in many forms, from heavy rains and seasonal storms to basement flooding, plumbing failures, appliance leaks, roof or window leaks, and sewer backups. Understanding these common causes is the first step in protecting your home and minimizing costly repairs.

Prevention is key. Regular home maintenance, proper waterproofing, routine inspections of plumbing and appliances, functional sump pumps, and sealed foundations can go a long way in mold prevention and keeping your property safe from water intrusion.

Even with the best precautions, some situations require professional expertise. HydroForce Cleaning & Restoration, Chicago’s trusted experts in professional water damage restoration, are ready to help with emergency water cleanup, basement cleanup, mold remediation, and storm damage repair. Our experienced team can assess the damage to your home, prevent further damage, and guide you through insurance documentation.

Don’t wait for a small leak to become a major problem. Schedule a free water damage inspection for your Chicagoland home with HydroForce today and ensure your home stays safe, dry, and protected. Call us at (630) 835-0862 today to request your free estimate.


Frequently Asked Questions (FAQs)

The most frequent causes include heavy rain and seasonal storms, basement flooding, plumbing failures, appliance leaks, roof or window leaks, and sewer or drain backups. Recognizing these sources early helps homeowners prevent costly repairs and mold growth.

Prevent basement flooding by maintaining sump pumps, sealing foundation cracks, grading soil away from your home, and ensuring gutters and downspouts are clear and functional. Regular inspections are key to protecting your property.

Common signs include wet or warped floors, musty odors, stained walls or ceilings, higher-than-normal water bills, and visible mold growth. Early detection can prevent further structural damage and health risks.

Call a professional immediately if you experience major flooding, black water from sewer backups, visible mold growth, or if insurance documentation is required. Professionals can safely restore your home and prevent long-term damage.

Yes. Appliances like washing machines, dishwashers, and water heaters can produce gray water that damages flooring, cabinets, and walls. Prompt repair or professional cleanup prevents mold and structural issues.

Categories
Fire and smoke damage restoration Restoration Tips

4 Reasons Why Your Smoke Detector is Beeping

24/7 EMERGENCY SERVICE RESIDENTIAL & COMMERCIAL SERVICES

Proper maintenance of your smoke detectors is essential to ensure they function effectively when you need them most and to prevent major fire damage. Understanding why your smoke detector is beeping, how to troubleshoot issues, and when to replace it are key steps in keeping your home or business safe from fire.

In this article, we’ll explore the common reasons behind smoke detectors beeping, the meaning of various chirping and beeping patterns, and a step-by-step guide to troubleshooting a beeping alarm. You’ll also learn how to change the battery in your smoke detector and the importance of scheduling regular fire alarm inspections to maintain optimal safety.

Why is My Smoke Detector Beeping?

Understanding why your smoke detector is beeping is essential for troubleshooting and ensuring it functions properly. To help you address the issue, here are a few key things to check:

  1. Low Battery Warning: A beeping smoke detector often signals a low battery. Whether it uses a 9V or lithium battery, be sure to replace it promptly to ensure the detector functions correctly and keeps you protected from potential fires.
  2. Debris Build-Up: If your smoke detector is chirping, it might be due to accumulated dust or debris interfering with its performance. Gently clean the detector using a soft cloth or an air blower to remove any obstructions and restore proper functionality.
  3. Temperature Fluctuations: Sudden temperature changes can sometimes trigger smoke detectors. Steam from showers, extreme attic cold, or heat from a stove are common culprits. If these fluctuations persist, consider relocating the detector to a more stable environment.
  4. Malfunctioning Sensors: Faulty sensors can also cause a smoke detector to chirp. These devices rely on steady voltage, which can be disrupted by loose battery connections or sensor malfunctions. Check the battery terminals, ensuring the battery is securely attached, and inspect the system for any loose connections. If needed, reattach the battery firmly to restore proper operation.

Why is My Smoke Detector Beeping - HydroForce Cleaning and Restoration

The Meaning of Smoke Detector Beeping and Chirping Patterns

Understanding the different chirping patterns on your smoke alarm is essential so you can take proper action. You should always refer to the owner’s manual to make sure you are correctly interpreting the problem. Here’s a quick overview of common chirping patterns and their meanings:

  • Beep-Beep-Beep: Smoke Detected: A series of three loud, consecutive beeps indicates that the smoke detector has detected smoke and there may be a fire in your property. Take immediate action.
  • Chirp-Chirp-Pause: Sensor Issue: If your smoke detector emits a series of chirps followed by a pause, it’s signaling a malfunction. This sound typically means the sensor may be obstructed or faulty. Check the detector to ensure it is functioning properly, as it cannot distinguish between a fire and a technical issue.
  • Single Beep with a Long Pause: Low Battery or Maintenance Needed: A single beep followed by a long pause usually means the battery is running low and needs replacing. However, this pattern can also indicate that the detector’s sensors are blocked by dirt or dust, or that the device itself may need to be replaced. Regular maintenance is key to keeping your smoke detector in top working condition.

Steps to Troubleshoot a Beeping Fire Alarm

Knowing how to troubleshoot a beeping fire alarm is essential for quick action and preventing potential damage to your property. Here’s a simple guide to help you address the issue effectively.

  1. Continuous Beeping: Evacuate your property immediately is this indicates the presence of a fire.
  2. Intermittent Beeping: Check the battery and connections on your fire alarm.
  3. Chirping: Replace the battery right away so you can ensure it works properly in the future.
  4. Listen to the Beep: Check for fire signs so you can avoid further damage.
  5. Change the Batteries: Use the proper batteries meant for your alarm.
  6. Clean the Alarm: Dust it off or use an air blower.
  7. Check the Environment: Check for fire damage or smoke.
  8. Reset the Alarm: Use the manufacturer’s instruction to reset the alarm.

How to Change the Battery in Your Smoke Detector

Changing the batteries in your smoke detector is a straightforward process. However, the exact steps may vary depending on the model. Generally, you’ll need a flathead screwdriver, a fresh 9V battery, and a step ladder. Here’s a simple guide to help you get started:

  • Twist open the smoke detector or use the screwdriver to open its cover.
  • If the smoke detector is hard-wired to your house, make sure to flip the circuit breaker before you disconnect it.
  • Detach the old 9V battery from its positive and negative connections.
  • Test the battery using a multimeter
  • Replace the dead 9V battery. Always make sure that the connection to the new battery is good and secure.
  • Use the test button to ensure that the battery powers the smoke detector.
  • Close the smoke detector and reattach it to the wall. If it has a battery drawer, make sure to close it.

Troubleshoot Your Beeping Fire Alarm - HydroForce Cleaning and Restoration

Schedule a Fire Alarm Inspection

Regular fire alarm inspections are essential for ensuring early fire detection and alerting occupants to evacuate safely. For business owners, adhering to the required inspection schedule is especially critical to comply with regulations and maintain a secure environment.

The frequency of fire alarm inspections depends on factors such as local regulations, the type of facility, and the complexity of your system. Below is a general guideline to help you understand the requirements for fire alarm inspections:

  • Do a monthly check: Do a monthly visual inspection to ensure that all the control panels display normal operation and there are no visible signs of damage.
  • Quarterly inspections: Make sure to test the batteries, communication pathways, and annunciators so you can make sure they are functioning properly.
  • Semi-annual inspections: All smoke detectors, alarm signals, and system communication with monitoring services should be verified.
  • Yearly fire alarm inspection: Make sure to conduct a full inspection and functional testing of the whole system that includes the detectors, alarm signals, and backup power sources.

Professional Fire Damage Restoration in Chicago, IL

Properly maintaining your smoke detectors is a critical part of home and workplace safety. By understanding the causes of beeping, learning how to troubleshoot common issues, and keeping up with battery replacements and regular inspections, you can ensure your alarm system functions reliably in the event of a fire. Taking these proactive steps helps protect lives and property by providing early warnings when seconds count.

Fire Damage Restoration - HydroForce Cleaning and Restoration

If you have experienced fire damage in your home or business, our professionals at HydroForce Cleaning and Restoration can help. We provide comprehensive fire damage restoration services for homeowners and businesses in Chicago, IL, and the surrounding areas. Our team ensures every detail is addressed, including replacing damaged smoke detectors to help safeguard your property against future fire risks.

For reliable fire damage restoration in Chicago, IL, and the surrounding areas, or to replace a faulty smoke detector, call us today at (630) 835-0862 to learn more.

Frequently Asked Questions (FAQs)

Smoke detectors often beep to indicate low battery, dust buildup, or a malfunction. Some models also beep periodically as a routine maintenance alert. Checking the battery, cleaning the unit, or resetting it usually resolves the issue.

It’s recommended to replace smoke detector batteries at least once a year. Some units use long-life batteries that last up to 10 years, but even these should be tested monthly to ensure proper function.

Yes, if the smoke detector continues to beep after changing the battery and cleaning it, the device may be malfunctioning or nearing the end of its lifespan. Most smoke detectors should be replaced every 8–10 years.

First, check and replace the battery if needed. Ensure the detector is clean and free of dust or cobwebs. If it still beeps, consider replacing the unit. Keeping the detector on a stable surface away from humidity and temperature extremes can prevent false alarms.

Categories
Restoration Tips Sewage Backup water damage

How to Safely Clean a Sewage Backup: Step-by-Step Guide

24/7 EMERGENCY SERVICE RESIDENTIAL & COMMERCIAL SERVICES

Dealing with a sewage backup in your home or business can be both overwhelming and expensive. Beyond the unpleasant odor, it can cause wastewater to back up into drains, potentially leading to significant property damage. Acting quickly and enlisting professional help is essential to prevent the situation from worsening.

In this article, we’ll explore the major risks associated with sewage backups and provide a step-by-step guide for cleaning up the mess. From properly sanitizing affected areas and handling utilities with care to disinfecting clothing, bedding, and food, we’ll cover everything you need to know to restore your space safely and effectively.

What are the Hazards of Sewage Backups?

A sewage backup in your home or business can be extremely hazardous, posing major health risks and potentially causing severe damage. If your basement is flooded, it’s crucial to avoid entering the area until gas and electrical services have been safely shut off. Proper cleanup is essential to prevent illnesses and limit the damage, and children and pets should be kept away from the affected areas.

Step-by-Step Guide for Cleaning Sewage Backups

How to Safely Clean Sewage Backups - HydroForce Cleaning and Restoration

For extensive sewage backups, it’s always best to hire a professional restoration service. However, if the affected area is small and you choose to handle it yourself, here are some steps to help you clean up safely and effectively:

Clean and Sanitize

  1. Make sure to drain all sewage water by natural draining or pumping.
  2. All dirt, soil, and debris should be cleaned from surfaces that have touched the flood waters.
  3. All walls, floors, and any surfaces touched by floodwater should be cleaned with hot water and detergent.
  4. Make sure to rinse all areas with hot water.
  5. Walls, floors, and other surfaces should be sanitized by mixing 2½ tablespoons (tbs) of Lysol/Pine Sol per gallon of water or 8 tablespoons (tbs) of laundry bleach in each gallon of water used.
  6. Make sure to air out the area by opening windows and using fans.
  7. You should make sure not to track flood debris and sewage into clean areas.

Utilities

  • Reach out to the utility companies to have gas and electricity shut off.
  • Never touch the fuse box or any cords that are plugged in until the electricity is shut off.
  • If an appliance is under water, do not use it.
  • Never relight any appliances before the gas company has checked them. Also, make sure all pilot lights are on before you relight burners.
  • Never light matches until the gas is shut off as this can cause an explosion if there is a gas leak.

Clothing and Bedding

All clothing, furniture, carpets, toys, and even bedding should be thrown out unless they are thoroughly cleaned and disinfected. If there are objects that are movable, they should be put outdoors so they can be cleaned and dried in the sunlight. Make sure to put any discarded clothing in tightly closed bags until they are picked up for disposal.

After cleaning up, it’s essential to thoroughly wash any clothing and body parts that came into contact with the sewage. Be sure to wash your hands immediately afterward. Anyone involved in sewage cleanup should take extra precautions such as avoiding touching your eyes, nose, or mouth if your hands are contaminated or smoking with soiled fingers, as this can transfer harmful bacteria to your mouth. Once the cleanup is complete, carefully wash your hands and nails using a nail brush and plenty of soap to ensure all traces of sewage are removed.

What is Sewer Water - HydroForce Cleaning and Restoration

Foods

If your food has been contaminated with sewage, consuming it is very dangerous. This is how you should deal with contaminated food:

  • Any food that is contaminated, whether it is boxed or bottled, should be disposed of.
  • Any canned goods and jars can be kept if you thoroughly clean them. To fully clean them you should follow this process:
    • Scrub them with soap and water by using the brush around the rim of the canned jars or tops of cans.
    • They should be submerged in chlorinated water for 15 minutes. Make sure to use 1 ounce of bleach per gallon of water.
    • Make sure to air dry canned jars or cans to prevent rusting.
  • Any food that was stored in the freezer can be kept for up to 2 days after losing power if the freezer is full and 1 day if the freezer is half-full and not opened.
  • If the meat has ice crystals, it may be safely re-frozen. If it is cool but not frozen, you should cook it and then re-freeze it.
  • Any food that was stored in the refrigerator can be kept for 4-6 hours after losing power, however, this depends on the room temperature. Never open the refrigerator unless it is necessary. You can also add ice to the refrigerator to help keep food cold.
  • Any food that has an unusual color, odor or is perishable should be thrown away.
  • Make sure that any food that you are discarding is placed in a tightly closed container until it is picked up for disposal.

Please note: The information given in the above article may differ by state and municipality. You should always reach out to your local health agencies for specific guidelines for your area and for specific suggestions as needed.

Professional Sewage Backup Cleaning in Chicago, IL

Sewer Cleanup Services - HydroForce Cleaning and Restoration

Sewage backups are not only messy and stressful but also pose serious health and safety risks that require immediate and thorough action. By following proper cleanup procedures or hiring a professional restoration company and taking precautions with utilities, personal belongings, and food, you can restore your home or business, minimize long-term damage, and ensure the safety of those within the home or building.

In most cases, sewage backups cause immense damage and create dangerous situations, which means they are best handled by professionals. At HydroForce Cleaning and Restoration, we specialize in providing comprehensive sewage backup cleaning services for homes and businesses in Chicago, IL, and nearby areas. Our skilled technicians are dedicated to cleaning, drying, and fully restoring your property to its original condition while ensuring a safe and healthy environment for your family.

You can call us at (630) 835-0862 for emergency sewage backup cleaning in Chicago, IL, and the surrounding suburbs.

Frequently Asked Questions (FAQs)

Small spills may be managed with proper protective gear, but sewage contains harmful bacteria and viruses, making DIY cleanup risky. For large backups or contamination of multiple areas, hiring a professional restoration company ensures safety and thorough sanitation.

Essential gear includes gloves, rubber boots, goggles, and an N95 mask or respirator. Wearing protective clothing that can be sanitized or discarded helps prevent exposure to harmful pathogens.

After removing contaminated water and debris, scrub hard surfaces with a mixture of water and bleach or a commercial disinfectant. Porous materials like carpet or drywall may need to be removed and replaced to prevent bacterial growth and lingering odors.

Regular plumbing maintenance, installing backflow prevention valves, and keeping drains clear of debris reduce the risk of backups. Addressing leaks or clogs promptly helps protect your home from costly water damage and contamination.

Categories
property damage water damage

Best Detection Methods to Find Water Leaks in Your House

24/7 EMERGENCY SERVICE RESIDENTIAL & COMMERCIAL SERVICES

Best Detection Methods to Find Water Leaks in Your House

Water leaks can wreak havoc on your home, causing significant damage to both the structure and your belongings. Acting quickly is crucial as calling professionals can help minimize the spread of the leak and prevent more severe damage. If you’ve spotted water stains on your ceilings, walls, or floors, it’s essential to contact water damage restoration professionals immediately to address the issue and salvage any affected items.

In this article, we’ll explore the common causes of water leaks, the areas where they typically occur, and whether they are classified as emergencies. We will also outline five effective methods to detect leaks in your home, offer solutions for fixing common issues, and share preventative tips to avoid future water damage. Plus, we highlight when it’s time to bring in the experts for professional assistance.

What are the Common Signs of Water Leaks?

Water leaks in your home can stem from a variety of issues, such as sewage backups, faulty appliances, damaged pipes, or even natural disasters. Understanding the common causes of water leaks is crucial for spotting them early and addressing them effectively. Here are some of the most frequent culprits behind household water leaks:

  • Unexplained increase in water bill: If your water bill is higher even though you are using the same amount of water, make sure to check your property for leaks.
  • Low water pressure: Low water pressure may happen because there is a water leak somewhere in your home. Make sure to check your plumbing system and find the leak so it can be repaired.
  • Damp or discolored spots: Always check your property for damp or discolored spots on the wall and ceiling as this may be a sign of a leak. Eventually, this may turn into an area that will develop mold growth.
  • Musty odors and mold growth: If you notice that your home has a musty smell, you may have a leak that has been left unattended as well as mold growth that has occurred because of this leak.
  • Peeling paint or wallpaper: If you’ve noticed that your paint or wallpaper is peeling, you may have a leak in the wall or the surrounding area that you haven’t noticed.
  • Sound of running water: If you hear running water sounds, determine where the sound is coming from and check for a leak.
  • Water pooling around appliances or fixtures: If water is pooling around an appliance, you should call a professional to fix the leak or replace the appliance.

Where Do Water Leaks Occur?

Leaks can happen just about anywhere in your home including near plumbing fixtures and appliances, under sinks, behind walls and ceilings, in the foundation, from the roof, and from pipes. It is important to always be vigilant for signs of leaks so you can address the issue quickly before it leads to severe damage and mold growth.

Are Water Leaks an Emergency?

Water leaks should always be treated as emergencies. Left unnoticed, they can lead to significant damage and costly repairs in your home because the water will continue spreading until it is stopped. Preventing leaks whenever possible is essential, but acting swiftly at the first sign of a leak is just as important to minimize potential harm.

5 Methods to Detect a Water Leak in Your House

How to Detect a Water Leak in The House - HydroForce Cleaning & Restoration

Knowing how to identify a leak in your home is essential for preventing costly damage to your property. Here are some key methods to help you detect leaks and protect your space:

1. Check Your Water Meter

To detect a hidden water leak, start by performing a water meter test. First, ensure all faucets and water-using appliances in your home are turned off. Then, check your water meter. If the meter continues to run, it’s a clear sign of a leak. Even if you don’t notice an immediate change, wait a few hours and check the meter again. Compare the readings—if the meter has moved, you may be dealing with a slow leak.

2. Perform a Toilet Dye Test

To check if your toilet is leaking, simply put a little bit of food coloring into the tank and keep it there overnight. If there is color in the bowl without flushing by morning, you have a leaky toilet.

3. Inspect Faucets and Pipes:

Check all your faucets and pipes for leaks and fix them promptly if they are leaking.

4. Use a Moisture Meter or Infrared Camera

A moisture meter is an effective tool for measuring the water content absorbed by a material. Alternatively, thermal imaging cameras can be used to detect heat radiating from objects, converting it into digital signals and detailed readouts for analysis.

5. Listen for Dripping or Running Water

If there’s no clear sign of a leak, try listening for the sound of running water. Sometimes, leaks can be detected through subtle noises coming from floors or walls.

How to Fix the Most Common Causes of Water Leaks

If you’ve encountered water leaks in your home, there are several effective ways to address them. Below are some common types of leaks and the best methods to repair them.

Dripping Faucet

Faucets can leak for various reasons, but the most common cause is wear and tear. Start by turning off the water supply and inspecting the washer—if it’s dirty, clean it thoroughly. If you notice any damage to the faucet, it may need to be replaced to resolve the issue.

Leaking Plastic Water Pipe

Start by identifying the source of the leak. Turn off the water supply and replace the damaged pipe. For a quick temporary fix, use tape and epoxy to seal the leak. If the damage is severe, contact a plumber immediately. While waiting for professional help, you can use a rubber patch secured with a hose clamp as a short-term solution.

Leaking Plastic Water Pipe Joint

Start by identifying the source of the leak, then immediately turn off the water supply to prevent further damage. If you’re confident in your skills, replace the damaged pipe yourself. Otherwise, it’s best to contact a professional plumber to handle the repair.

Shower That is Leaking

Start by shutting off the water supply. Remove the handle cap, the handle, and the faceplate. If your shower doesn’t have a handle, take out the locking clip and the cartridge. Replace the cartridge along with any other necessary components. Once everything is reassembled, turn the water back on, open the tap, and let it run to ensure everything is working properly.

Bottom of Toilet Leak

Fixing a leaking toilet can be straightforward with the right approach. If the leak is coming from the base, it’s often due to a worn-out rubber seal or loose tee bolts that secure the toilet in place. To resolve this issue, you need to replace the wax ring and use an adjustable wrench to loosen and tighten the bolts as needed. While this repair is manageable for some, calling a professional plumber is often the best option to ensure the job is done correctly and efficiently.

Preventative Measures to Avoid Water Leaks

Water leaks can sometimes be quick to fix if they are found early, but preventing them altogether is the best way to avoid expensive home repairs. Taking proactive steps can save you time, money, and stress.

Water Leak Prevention Methods - HydroForce Cleaning & Restoration

Here are some practical measures you can implement to prevent water leaks in your home:

  • Inspect your plumbing regularly: Regularly inspect all pipes, including those under sinks and behind toilets, for signs of corrosion, rust, or moisture. If you notice any issues, address them promptly to prevent further damage. Additionally, schedule routine plumbing inspections to ensure your system remains in top condition.
  • Monitor the water pressure: Make sure to use a water pressure gauge to check the pressure in your home. The water pressure should be between 40 and 60 psi (pounds per square inch). If the water pressure is too high, you should install a pressure regulator to maintain a safe pressure level which reduces the risk of pipe damage.
  • Get water leak detectors installed: This device is designed to alert you when water is detected in areas where it shouldn’t be. Ideal for placement near appliances like water heaters, washing machines, dishwashers, or sinks, it serves as an early warning system for leaks. When a leak is detected, an alarm sounds to notify you, allowing you to take swift action. Advanced models go a step further by sending real-time alerts directly to your phone, ensuring you’re always informed, even when away.
  • Make sure you maintain your appliances: Appliances like washing machines, dishwashers, and water heaters can develop leaks over time. Regular maintenance is essential to prevent these issues and keep your appliances running smoothly.
  • Clean your gutters and downspouts: Always clean your gutters and downspouts so that rainwater and melting snow drain properly. Clogged gutters will cause the water to overflow and run down the side of the house which can cause leaks.
  • Check your basement and crawl space: Water leaks commonly occur in these areas, making regular inspections essential. Look for signs such as moisture, damp walls, mold growth, or unpleasant odors to catch any issues early.
  • Be careful when using chemicals: Harsh chemicals can harm your pipes, potentially leading to costly leaks. Only use them if you’re certain they won’t cause damage, and no other options are available. Whenever possible, start with safer alternatives like a plunger or drain snake before resorting to chemical solutions.
  • Do proper maintenance of your landscaping: Proper landscaping maintenance is essential to prevent water from pooling around your home, which can lead to foundation leaks and other issues.

When to Contact the Professionals

If you discover a leak in your home, it’s essential to act quickly by contacting a professional water damage restoration company. Prompt action can prevent extensive and costly damage while increasing the chances of salvaging affected items. Delaying your response to water damage can lead to mold growth, which poses serious risks to both your property and your health. Professional restoration experts can not only remove mold effectively but also take steps to ensure it doesn’t return.

Reliable Water Damage Restoration in Chicago, IL

Water Damage Restoration - HydroForce Cleaning & Restoration

If you are dealing with water damage due to a leak in your home or business, HydroForce Cleaning and Restoration is here to help with our professional water damage restoration services. Our expert technicians specialize in leak detection, water removal, and complete property cleanup to restore your space quickly and efficiently. Water damage can cause significant harm to your property, but we’re equipped to prevent further issues.

If you’ve noticed mold growth, don’t wait—call us immediately. We will not only remove the mold but also take steps to ensure it doesn’t return. You can trust our professionals at HydroForce Cleaning and Restoration to protect and restore your Chicago property with precision and care.

For emergency water damage restoration, call HydroForce Cleaning and Restoration at 630-835-0862.

Frequently Asked Questions (FAQs)

Common signs include unusually high water bills, damp or discolored walls and ceilings, mold or mildew growth, the sound of running water when all taps are off, and warped or buckled flooring. Early detection helps prevent major water damage.

Hidden leaks can be detected using moisture meters, infrared thermal imaging cameras, or by monitoring water meter readings when all water is turned off. Professionals often use these tools to pinpoint leaks without causing unnecessary damage.

Yes, homeowners can check for leaks by inspecting visible pipes, faucets, toilets, and appliances. Listening for unusual sounds, looking for water stains, and monitoring the water meter can help detect leaks, but some leaks may require professional tools for accurate identification.

Early detection prevents costly structural damage, mold growth, and health hazards. Repairing leaks promptly also reduces water waste and can lower your utility bills.

Categories
water damage

How to Repair Drywall Affected by Water Damage

24/7 EMERGENCY SERVICE RESIDENTIAL & COMMERCIAL SERVICES

How to Repair Drywall Affected by Water Damage

Water damage in your home or business can develop gradually or occur suddenly. Regardless of how it happens, it’s essential to address it immediately. Delaying repairs can lead to further deterioration, resulting in higher restoration costs.

Drywall is particularly vulnerable to water damage because it is a porous material. Water-damaged drywall may experience issues such as cracks, peeling, or buckling, which can evolve into both cosmetic and structural problems. Prolonged water damage also increases the risk of mold and mildew growth. If you notice water damage in your drywall, ensure it is repaired promptly to prevent these complications.

How Do I Know If I Have Water Damage in My Walls?

Remember that drywall is porous and can retain moisture even after the water appears to have dried. In cases of flooding, whether from overflowing bathtubs or burst pipes, it’s safe to assume your drywall is compromised, risking mold and mildew growth if untreated.

For smaller leaks, damage might not be immediately obvious. Watch for signs like peeling walls, cracking paint, bubbling wallpaper, soft drywall, musty odors, or stains. Such issues often arise from slow pipe leaks, aging seals around doors and windows, or clogged gutters.

What You Should Know Before Repairing Water-Damaged Drywall

If you decide to repair the water-damaged drywall yourself, there are a few things you need to know:

  • If overhead flooding has led to wet drywall, there’s a risk that the ceiling is compromised and could collapse. In such cases, it’s essential to hire a professional water restoration company to address the damage.
  • If the damage is caused by sewage backup, you will need to call a professional to address the damage. This type of cleaning may end up involving biohazard materials which should be handled by a professional.
  • You will need to find and address the source of the water or moisture. Get rid of the standing water and dry out any water-damaged areas. If you leave the water sitting, you will end up with more damage to your drywall.

What is the Process of Repairing a Water-Damaged Wall?

First, clear the area by removing water-soaked furniture and building materials. Also, remove wet carpet and padding, or at least pull it back to allow the floor to air out. When you are ready to repair the drywall, follow these steps:

How to Repair Water Damaged Drywall - HydroForce Cleaning and Restoration

1. Be Safe

If the drywall needs to be removed, make sure that you wear the proper respiratory protection in case your drywall has asbestos. Also, make sure to switch off the circuit breakers and remove any non-affected electrical outlets before any wall material is torn out.

2. Get Rid of Any Damaged Materials

You will need to figure out how much drywall needs to be cut out. If the flooding level was less than two and a half feet, then the wall material needs to be removed up to a height of four feet. This will help when you reinstall the full sheets of drywall.

If you have more than two and a half feet of damage to your drywall, then you will need to remove the drywall up to eight feet or to the ceiling junction, whichever is higher.

If you cannot tell the level of damage, inspect the drywall and remove areas that are cracked, crumbling, or sagging. If the wall is damp, and the water is clean (such as from a burst pipe) you can try to dry it. You may need to remove the damaged wall studs, cabinets, and even ceilings and cut out damaged portions of the drywall.

3. Cut the Drywall

It is important to follow the proper steps to cut out sections of water-damaged drywall. Here are a few things you will need to do:

  • Mark the wall properly with a straight line right above where the water has stopped wicking using a chalk line.
  • You will need to cut along the chalk line about one-half to three-quarters through the drywall using a utility knife.
  • Remove any damaged portions of the drywall by knocking a small hole in it with a hammer. Then gently pull the drywall out.
  • Once the drywall has been cut out and removed, make sure to take the insulation out. If it is made of plastic foam, you can leave it as it is and let it dry.

Fans to Dry Out Water Damaged Walls - HydroForce Cleaning and Restoration

4. Dry Out the Wall

Once you remove all the water-damaged drywall, it is important to then dry the area around and inside the wall. Make sure to use specialized blowers and dehumidifiers and open all windows and doors. Using fans will help increase the airflow behind the walls and they should be running for at least two days so that the studs and flooring can fully dry.

5. Properly Sanitize and Deodorize

Use a chemical sanitizer to help prevent mold and bacteria between the walls. Do not use bleach as it will not help. If there are residual odors, make sure to use an ozone machine and keep it running for at least eight hours. While the machine is running, leave the area.

6. Replace the Water-Damaged Drywall

Once you’ve sanitized the area, you will need to hang new drywall. Make sure to accurately measure the size of the hole so that you know how much to cut out from the new sheet of drywall. Put four drywall clips around the hole and secure each one using a drywall screw.

Then insert the drywall pieces and secure them into the drywall clips. Do not tighten the drywall screws too much. Instead, use drywall tape and joint compound and blend it with the existing drywall. Then as a final step, you will need to sand the area a few times to smooth the wall surface out.

7. Paint the Restored Drywall

Make sure that the joint compound is fully dry and then paint the wall with a primer so that it can seal properly. Then you can paint the whole wall so that you have a fully uniform color.

Professional Water Damage Restoration

Water Damage Restoration - HydroForce Cleaning & Restoration

Leaks behind walls and above ceilings can significantly damage the drywall because its porous nature allows the water to spread through it. It is very important to recognize signs of water damage to the drywall, such as bubbling, sagging, stains, and wet spots so you can take action before the water causes more serious structural damage.

Following the steps outlined above can help you repair water-damaged drywall, but some situations may be too complicated to handle yourself. If you experience extensive water damage to your drywall or do not feel confident in addressing the problem yourself, you can reach out to our professionals at HydroForce Cleaning and Restoration.

At HydroForce Cleaning and Restoration, we offer a full range of water damage restoration services to address issues such as leaks that lead to water-damaged ceilings and drywall. Our technicians can identify the source of the water and uncover the full extent of the water damage to determine the best course of action. We used advanced drying equipment to thoroughly dry affected drywall and we can also remove and replace drywall that has been heavily damaged.

You can call HydroForce 24/7 at (630) 835-0862 if you need professional water damage restoration services in the Chicago, IL area.

Frequently Asked Questions (FAQs)

Minor water damage, such as small stains or soft spots, can often be repaired by drying the area, applying a stain-blocking primer, and repainting. Severe damage, including sagging, mold growth, or crumbling drywall, usually requires removing and replacing the affected section.

Ensure the drywall is completely dry before making repairs. Use a dehumidifier or fans to speed up drying, and treat the area with a mold-resistant primer. For extensive water damage, professional restoration may be necessary to eliminate hidden mold.

Simple repairs like patching and painting can take a few hours to a day, while replacing larger sections or addressing mold issues may take several days, depending on drying time and the extent of the damage.

For minor cosmetic damage, DIY repairs are possible. However, for large-scale water damage, sagging drywall, or mold contamination, hiring a professional ensures the repair is safe, thorough, and prevents future problems.

Categories
Disaster Recovery property damage

A Guide to filing a property damage claim

24/7 EMERGENCY SERVICE RESIDENTIAL & COMMERCIAL SERVICES

It happens to the best of us. A big storm or a big winter freeze can leave home owners wondering what to do when an unfortunate event causes damage to their home. Most home owners have insurance which can help to keep out of pocket expenses to a minimum. Do not be afraid to call your insurance company! However the process for filing and handling a claim can be confusing, which is why you should hire a professional to help you handle the claim and ensure that your home can be properly fixed (and within a reasonable amount of time!). Below is a step by step guide to filing a property damage claim: 1. Evaluate the damage- Before filing a claim you should ask yourself “is this worth filing a claim over?” Property damage can be as small as patching and painting a small spot on the wall to an entire basement flooding. Sometimes the cost for repairs can be less than your deductible so you will want to find out what exactly your deductible is. Never go into any situation that you feel is not safe! (i.e house fire) 2. Call a professional mitigation company- It may be a good idea to call a company to come out that handles damage claims on a regular basis. They will be able show you damages that you cannot see and give you a better idea of the cost associated with repairs. They may also be able to help you call your insurance company and help explain what has happened. 3. Call your insurance company- If you have a big, well known insurance company it is usually best to call their 24/7 call centers when filing a claim. Most big insurance companies have switched from having you call your agent to calling a call center. The call center will take all of the information and give you a claim number. Generally the claim rep will give you a call within 24-48 hours. Sometimes this process can take longer depending on if it is a catastrophic event (i.e hurricane, wild fires) A Guide to filing a property damage claim 4. Have the mitigation company get started working-Most reputable water & fire restoration companies will get started working after you have signed a service agreement and filed a claim for the price of your deductible (this can vary depending on the situation) They will then submit all paperwork to the insurance company for review and payment. You never want to wait in an emergency situation because you can get secondary damage which your insurance company might not pay for. Remember, a mitigation companies job is to “mitigate” the situation, Rebuilding will be a different part of your claim. 5. Wait for your claim rep to examine the damage- You will want for your insurance companies claim rep to come into your home and examine the damage. Then your insurance company will generally give you an estimate based on their findings. Remember this is just an ESTIMATE! You will want to hire a reputable restoration company to help you with the paperwork on your claim to make sure you are getting ALL of the money your home is entitled to. 6. Have a reputable restoration company repair the damages to your home- Working with a reputable restoration company to rebuild your home can save you a lot of time and headaches. A good company will know how to get the appropriate amount of money from your insurance company and in many if not all cases will make your home look better than it did before it was damaged. If you need any help with water & fire restoration in Chicago please do not hesitate to give us a call at 630-835-0862. We can help you through all aspects of your claim and always strive to give it our all and do the best we can for every single customer!