Steps to Remove Mold from Plywood in the Attic
Home » Steps to Remove Mold from Plywood in the Attic
The attic is a part of the home that often gets neglected. However, you should not ignore your attic as it is a prime spot for water damage and mold growth. It is important to regularly check the walls, floors, sides, and corners of the attic to make sure there is no mold forming anywhere. If you do notice mold, it is crucial to address it right away as it can cause significant damage and have an effect on your health.
Why Does Plywood Get Moldy?
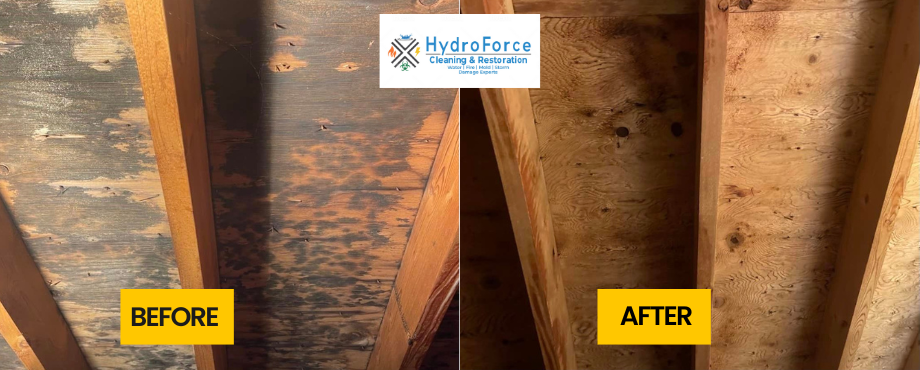
Mold can appear on treated or untreated plywood. The causes of mold on plywood include temperature, humidity, extra moisture, and the presence of mold spores. Mold on plywood is typically black in color, and it spreads quickly if it has the right conditions, especially if it is wet and humid. Mold and algae affect only the surface and do not get into the plywood structure itself. However, when there is decay in the plywood, the mold can penetrate the surface.
What Does Mold on Plywood Look Like?
Mold on plywood is typically black or green in color. It can appear on untreated plywood and on H3.1 LOSP and H3.2 treated plywood. This is most likely to happen if the plywood becomes wet or the attic has the proper conditions for mold to form. Sometimes, weather conditions involving heat or humidity can create the right conditions for mold to form.
Here are some things you should look out for if you think you have mold on the plywood in the attic:
- If there is moisture present, you may already have mold.
- The wood looks damaged and discolored.
- If you see spores on the surface of the wood packaging, you may have mold.
Identifying mold on your plywood can be tricky as you may mistake it for simple iron stains, mineral discoloration, or sun exposure. Make sure to consult a professional to determine if you have mold and start the remediation process right away. Also, speak to them about future preventative measures you can take to avoid mold.
How to Prevent Mold on Subfloors
Mold in your attic happens due to excess moisture from a leak in your roof, or an issue with the structure that is causing the extra moisture. The mold spores in the attic will spread to the rest of the home quickly and exposure to mold can trigger allergic reactions. It is important to prevent mold in your attic to avoid property damage and the possible health effects.
Here are some steps to follow so you can be sure to prevent mold in your attic.
- Keep a minimal difference in exterior and interior temperature: Make sure that you keep the temperature inside similar to the temperature outside so that you do not create condensation on the underside of the roof sheathing.
- Work with a professional to identify air leaks: A professional will be able to identify any air leaks in the interior of your attic.
- Get any points of entry air sealed: You should make sure to air seal any points of entry such as bathroom fans and hoses, recessed lighting etc. Also, if you have any holes or gaps where there is wiring, plumbing, vents, pipes, or ducts, make sure to get those sealed.
- Check for ventilation that is damaged or blocked: Check all the rafter ventilation and make sure it is not blocked or damaged.
- Repair the baffles: If your rafter ventilation is broken or improperly installed, make sure to repair it.
- Allow for proper ventilation: You can decide on the proper amount of ventilation in your attic by figuring out the amount of roof ventilation that is needed for your attic space.
- Fix the roof if needed: If you have leaks in the roof or any damage, make sure to get it repaired.
- Decrease moisture: If you have moisture coming in from a gap or a crack, make sure to get it fixed.
- The appliance vents should be on the outside: The vents for your appliances coming from the bathroom, kitchen, and the dryer should blow air to the outside.
- Use insulation: Make sure you are using the proper insulation like cellulose to prevent the formation of mold growth.
Steps to Remove Attic Mold from Plywood
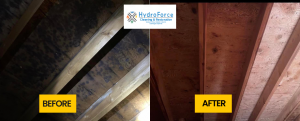
Even if you take all the abovementioned precautions, you may end up with mold in your attic. It is always easier to have it removed by professionals; however, if the surface area is not too large, you can attempt to remove it yourself. Here are the steps to follow:
1. Seal the area and use protective gear
Cover the surrounding area with plastic sheeting so that mold spores don’t spread. Use protective gear such as googles, masks, and rubber gloves to protect yourself.
2. Vacuum the area
If there is water present, make sure to use a wet vacuum to get rid of it. Then dry out the area with fans, dehumidifiers, and heaters. Next, dry vacuum to get rid of the mold spores. Make sure to empty the vacuum outside and seal the bag you’ve used to dispose of it, so the spores do not spread.
3. Clean off the mold
If the mold hasn’t gotten through very deep into the wood, it can probably be killed with dish soap and warm water. Take a teaspoon of soap and fill a spray bottle with water and shake it up. Next, spray the area and scrub it with a brush to get rid of the mold. Finally, dry the area with a towel. You can also use distilled white vinegar. Make sure to use equal parts vinegar and warm water in a spray bottle and spray it on the mold. Next, let the solution dry for an hour and then wipe it with a wet cloth and then a dry one.
The final option is using borax, which is a more natural and safer way to clean than bleach. Use a tablespoon of borax with a cup of water, then put this solution on the molded area with a brush. Make sure to scrub the mold away which will leave the borax solution in the wood. Do not sponge up the extra liquid. You want to make sure leave as much solution as possible so that future mold growth can be prevented. Finally, use a humidifier or a fan so that the wood can dry quickly.
4. Sand the wood
The mentioned cleaning solutions should get rid of the mold issue, however, if you are unable to get rid of it, the final solution is sanding. Make sure to use 100-grit sandpaper on the affected area while making sure to not sand away too much of the surrounding area. Keep repeating this process until the mold spores have loosened.
Conclusion
Mold can happen at any time in your attic, especially if it is not maintained. If you’ve experienced mold at your home or business, we can help. Mold in your attic can cause costly damage. HydroForce Cleaning & Restoration provides complete mold remediation to ensure that the mold is fully removed and that it does not come back. For all of your mold removal needs, make sure to reach out to HydroForce Cleaning and Restoration at 630-835-0862.
Related Restoration Posts
2026 © Copyright HydroForce Cleaning and Restorations – All Rights Reserved.
Privacy Policy | Terms & Conditions | 630-835-0862

